“`html
Why Light Switches Get Hot in the First Place
A hot light switch isn’t normal. I learned this the hard way when I grabbed one in my hallway and yanked my hand back — it was warm enough to be uncomfortable but not quite painful. That moment sent me down a research rabbit hole involving my electrician, a trip to the hardware store, and honestly, some panic scrolling through electrical forums at midnight.
Three core culprits cause this problem: an overloaded circuit dumping too much electrical current through undersized wiring, loose wire connections creating resistance at the switch terminal, or a defective switch mechanism with internal damage.
Here’s what happens. Electricity travels through copper wires into your switch. When resistance increases — from loose connections, corroded terminals, or a worn-out switch — electrical energy converts to heat. Same reason your phone charger gets warm after an hour of use. Except your light switch is handling 15 or 20 amps, not 2, so the heat buildup becomes noticeable. Potentially dangerous, too.
Overloaded circuits are the most common scenario. Picture this: your bedroom has one 15-amp circuit powering the light switch, a space heater, a phone charger, and a lamp. Everything runs fine individually. Run them all simultaneously? Current exceeds the wire’s safe capacity. The switch becomes a bottleneck where all that current converges, generating heat.
Loose connections are the sneaky culprit nobody thinks about until it’s too late. Wire terminals at the back of switches loosen over years of vibration, thermal expansion and contraction, or just sloppy installation. A loose connection increases electrical resistance dramatically — far more than a properly seated wire. A seemingly minor gap creates major heat.
Defective switches fail internally when mechanical contacts wear out or corrode. The contacts are supposed to open and close smoothly. When they don’t, current arcs across the gap, generating extreme localized heat. This scenario requires immediate replacement.
How to Check If Your Hot Switch Is Safe or Dangerous
Before you touch anything, turn off the breaker controlling that switch. Seriously. Don’t skip this step because you’re confident or impatient. Both are excellent ways to earn an electrical shock you won’t walk away from.
Once the breaker is off, grab a non-contact voltage tester — the pen-shaped tool that beeps near live wires. They cost $8 to $15 at any hardware store. I use the Fluke 1AC-A1, though a basic model works fine for this. Scan the switch with the tester to confirm zero voltage. The tester should stay silent.
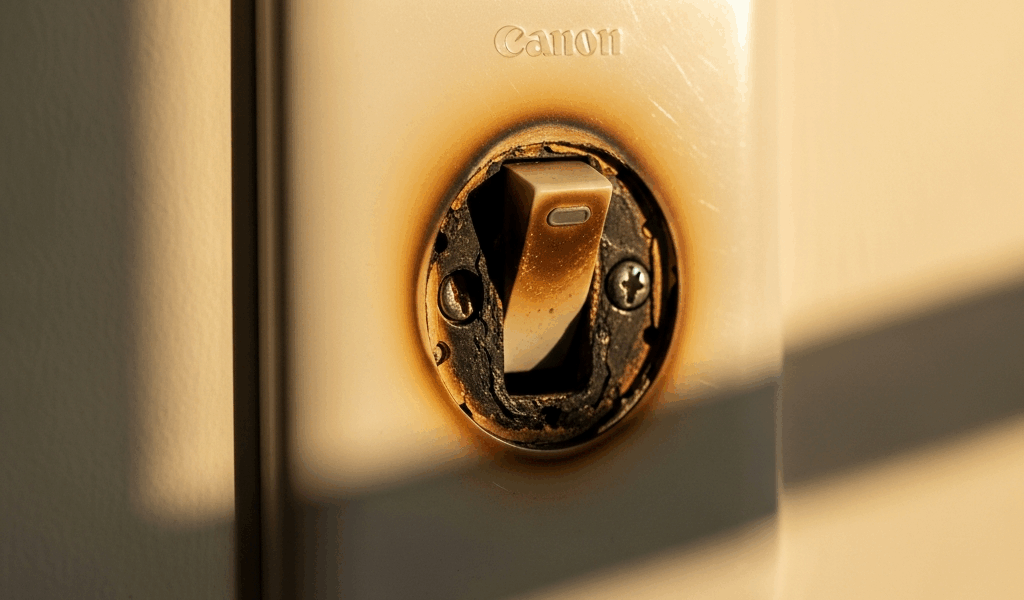
Now inspect the switch itself. Look for visible damage: black scorch marks, melted plastic around the terminals, discolored metal, or a burnt smell. Any of these indicates the switch has overheated enough to damage internal components. That’s a call-the-electrician situation, not a DIY fix.
Feel around the switch plate and the outlet box behind it. You’re checking for heat retention or evidence of sustained temperature. A warm switch that’s been off for five minutes suggests the overheating was significant.
Next, examine the terminal screws at the back of the switch — the tiny screws that hold the wires in place. Use a flathead screwdriver to gently try turning each screw clockwise. If they turn easily, you’ve found your culprit: loose connections. If they’re already tight, turn the breaker back on and move to the next diagnostic step.
Tighten loose terminals carefully. A quarter-turn is usually enough. Don’t crank it — over-tightening can crack the terminal or damage the wire insulation. Once tightened, turn the breaker back on and monitor the switch for the next week. If it stays cool, you’ve solved it.
Here’s the important part: if tightening doesn’t fix the problem, or if the switch was already tight, the issue is upstream — either circuit overload or the switch itself is failing internally. Stop and call a professional.
Loose Connection at the Switch Terminal
Wire connections loosen for predictable reasons. Thermal cycling — the constant expansion and contraction of copper wire as current flows and stops — gradually works connections loose over months or years. Vibration from heavy equipment nearby, footsteps, or even slamming doors can jiggle connections incrementally looser. Sometimes, contractors just didn’t twist them tight enough during installation.
A loose connection creates what electricians call a “high-resistance joint.” Imagine water flowing through a partially clogged pipe. The pipe itself isn’t damaged, but the restriction forces water to work harder, building pressure. Electrical current behaves identically. Loose connections force current to squeeze through a narrower path, generating heat at the point of contact.
The warning signs are specific. The switch feels warm to the touch even at idle — when you’re not using anything on that circuit. The switch might click or make a faint snapping sound as contacts shift. You might notice a faint burnt smell, like hot plastic or insulation degrading. The light might flicker slightly when you flip the switch.
To tighten a loose connection safely, you need the right tool: a flathead screwdriver that fits the terminal screw snugly. A screwdriver that’s too small will strip the screw; one too large won’t grip properly. I keep a jeweler’s screwdriver set ($12) specifically for electrical work.
With the breaker off and voltage confirmed dead with your tester, grip the switch body with one hand to prevent it from spinning. Using your screwdriver, turn the terminal screw clockwise in small increments — a quarter-turn, then pause. Turn again. You’re looking for slight resistance that indicates the screw is seated properly. The wire should be clamped firmly but not crushed.
If a screw spins endlessly without tightening, the internal threading is stripped. That switch needs replacement. If tightening works but the problem returns within days, the connection is experiencing mechanical stress — usually from a wire that’s too thick for the terminal or improper wire bending. Call an electrician to assess whether the switch terminal is damaged or the installation is fundamentally flawed.
Overloaded Circuit Signs and What to Do
An overloaded circuit is different from a loose connection. The switch isn’t failing — the entire circuit is working beyond its rated capacity.
Here’s the electrical rule: a 15-amp circuit can safely handle 80% of its rating continuously, which is 12 amps. A 20-amp circuit maxes out at 16 amps continuous. Pull more than that, and the circuit gets hot. The heat develops gradually across the entire wiring run, and the switch — being where current concentrates — often feels hot first.
Symptoms of circuit overload are specific. Lights dim noticeably when you switch them on, especially if other devices are running. The circuit breaker trips randomly, usually when you plug in multiple devices simultaneously. Outlets on the same circuit feel warm to the touch. You smell a faint burnt smell that disappears when you turn off certain appliances.
To diagnose circuit overload, list every device connected to that breaker. Check your electrical panel — the breaker label usually identifies the circuit. Common circuits power bedroom lights plus outlets, bathroom lights plus outlets, and kitchen countertop outlets. Add up the wattage of everything plugged in or running.
For example: a 40-watt LED bulb, a 600-watt space heater, a 500-watt space heater, and a 100-watt lamp all on one 15-amp, 120-volt circuit equals 1,240 watts. One breaker can safely handle 1,440 watts (12 amps × 120 volts), so you’re close to the limit — too close. Run all four devices, and you’re exceeding capacity.
The fix requires either reducing load or adding a circuit. Probably should have opened with this section, honestly — it’s the outcome most homeowners need to hear. You’ll likely need an electrician to add a new circuit, which involves running wire from the electrical panel to a new outlet or switch. Cost varies by region and complexity, usually $200 to $800 per new circuit.
Temporary relief comes from unplugging devices or using fewer things simultaneously. That’s not a permanent solution, though. Overloaded circuits remain fire risks.
When to Call an Electrician vs. DIY
Here’s the decision tree.
Call an electrician immediately if: You smell a burnt smell that persists. You see black scorch marks or melted plastic on the switch. The switch remains hot even after you’ve turned off all connected devices. Multiple switches on the same circuit are hot. The breaker keeps tripping. The switch was tight and warm with no loose connections found.
Monitor and watch if: The switch feels warm, but not hot. Tightening the terminal screws was successful, and the switch feels cool after several days of normal use. There are no visual signs of damage or burnt smell. Lights aren’t dimming, breaker isn’t tripping.
DIY territory: Tightening loose terminal screws falls here, assuming the screw is accessible and you confirm zero voltage beforehand. Unplugging devices to test whether overload is the cause also fits. Using a non-contact voltage tester to confirm the switch is dead before touching anything is absolutely DIY-appropriate and essential.
What shouldn’t be DIY: replacing the switch itself, running new circuits, installing a new breaker, or working inside the electrical panel. These require licensing in most jurisdictions and involve serious electrocution or fire risk if done incorrectly.
The electrician call usually costs $150 to $300 for diagnosis and minor repair, depending on your region and the electrician’s service fee structure. Given that an electrical fire could cost you everything, it’s money well spent when you’re unsure.
Your hot light switch is worth taking seriously, but it’s not automatically catastrophic. Diagnose systematically. Tighten what you can safely tighten. Call a professional when you hit the limits of basic troubleshooting. That approach keeps you safe and keeps your house standing.
“`


Stay in the loop
Get the latest northwest electric pros updates delivered to your inbox.