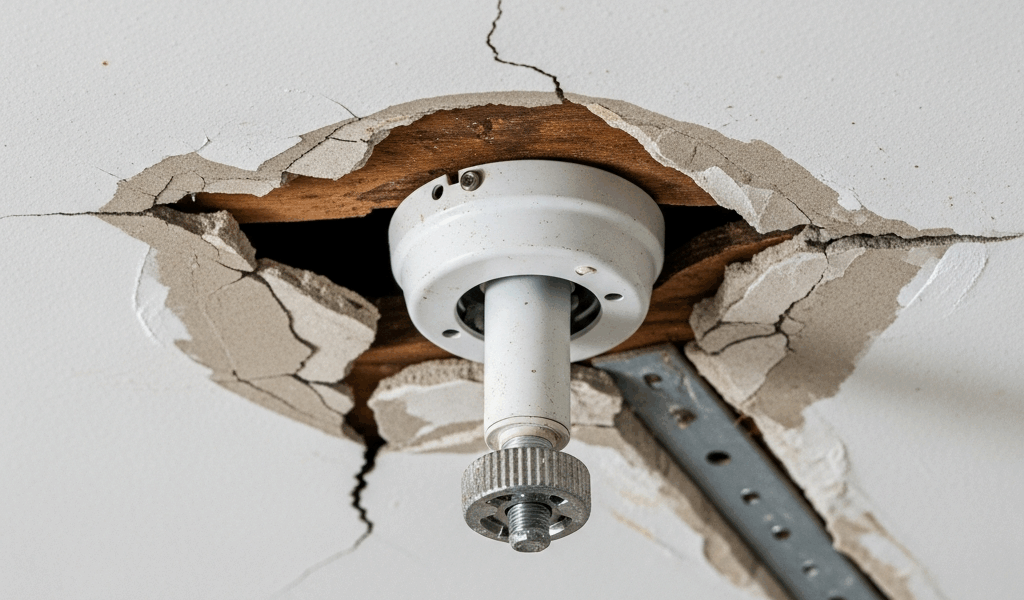
If a ceiling fan’s canopy, box, or bracket is pulling away from the ceiling, stop using the fan. Keep people away from the area and arrange a qualified inspection. If there is smoke, arcing, a burning odor, exposed wiring, or signs that the fan may fall, leave the immediate area and shut off the circuit only if you can do so safely.
Do not pull on the fan, push the canopy back into place, tighten visible screws while it is energized, or run it again to “see what moves.” Movement can come from damaged drywall, a loose mounting bracket, an incorrectly installed box, failed structural support, or more than one problem at once. The safe repair depends on identifying the actual load path.
What may be moving
A ceiling-fan installation includes several different parts. The decorative canopy can loosen without the outlet box moving. The fan bracket can loosen from its approved support. The outlet box or brace can detach or deform. Drywall can crack around a correctly supported box, or the entire assembly can be improperly relying on the ceiling finish.
Those conditions do not have the same remedy. A photograph from below rarely proves which component failed, and fan weight alone does not answer the question.
Why drywall is not the fan support
Drywall is a ceiling finish, not an acceptable sole structural support for a ceiling-suspended fan. The fan must be supported by a method permitted for that fan and installation—commonly a listed fan-support box or box system installed as directed, or an approved independent connection to suitable building structure.
An ordinary light-fixture box is not made suitable merely by adding larger screws, toggle anchors, washers, or construction adhesive. Likewise, a metal box is not automatically fan-rated and a nonmetallic box is not automatically unsuitable. The product’s fan-support listing, marking, model instructions, and actual installation control.
Immediate safety checklist
- Turn the fan off without approaching a visibly failing assembly.
- Keep people, pets, and furniture out from underneath it.
- If there is an electrical warning sign, shut off the correct breaker only when it is safe and obtain urgent help.
- Do not touch exposed conductors or rely on a wall switch to prove a ceiling box is de-energized.
- Do not perform a pull, shake, or load test.
- Record the fan model and take photos from a safe distance for the electrician or installer.
Common causes an inspection should distinguish
A loose canopy
The decorative canopy can shift while the bracket and box remain secure. That is less serious than a moving support, but it should not be assumed from below. Power must be controlled and the assembly inspected according to the fan manufacturer’s instructions.
A loose fan bracket
Incorrect, missing, substituted, or loosened mounting hardware can allow the bracket to move. The correct fasteners and torque are product-specific. Reusing miscellaneous screws or tightening until something “feels solid” can damage threads or conceal a larger support problem.
An unsuitable outlet box
If the box or box system is the fan’s sole support, it must be listed and marked as suitable for ceiling-fan support and used within its marked conditions. An unmarked fixture box should not be treated as fan-rated based on appearance or a guessed weight capacity.
A failed or incorrectly installed brace
A listed brace-and-box system can fail to perform as intended if the wrong components were combined, its span is outside instructions, it was not expanded or fastened correctly, or framing is damaged. The exact model and installation must be verified.
Damaged ceiling finish or framing
Water damage, cracked drywall, deteriorated plaster, split framing, corrosion, previous alterations, or a poorly repaired opening may complicate the repair. The ceiling finish can crack even when the fan has independent structural support, so visible drywall damage does not by itself establish the support’s condition.
What a qualified inspection should verify
- the fan’s exact model, installed configuration, and manufacturer instructions;
- the box or brace model and explicit fan-support marking;
- the marked maximum fan weight and any span or framing restrictions;
- whether the fan bracket is supported by the listed box system or independently by structure;
- whether all specified hardware is present and undamaged;
- the condition of framing, ceiling finish, conductors, grounding, and bonding;
- box fill, wiring method, controls, and environmental rating; and
- applicable local permit, inspection, and adopted-code requirements.
For product-identification steps, use our fan-support box inspection guide. For the frequently misunderstood 35- and 70-pound provisions, read how ceiling-fan box weight limits work under NEC 314.27(C).
Repair approaches
The correct repair might be limited to manufacturer-specified bracket hardware, but a compromised support usually requires more. Depending on framing and access, a professional may install a listed retrofit fan brace, a listed box fastened to suitable framing, or manufacturer-directed independent structural support. Damaged drywall or framing may also require repair.
Do not select a replacement by a marketplace headline alone. Verify the manufacturer’s current instructions, listing, fan rating, required fasteners, joist-spacing limits, ceiling configuration, box volume, and location rating. A product advertised for a heavy light fixture may have a different ceiling-fan rating.
Can you keep using the fan if only the drywall is cracked?
Not until the support path is verified. A cosmetic crack can occur independently of the fan support, but it can also accompany movement. Continued rotation adds changing forces and can worsen a loose assembly. Inspection is preferable to guessing from crack size.
Bottom line
A ceiling fan pulling through or separating from drywall is a stop-use condition, not a routine wobble adjustment. Secure the area, address any electrical emergency, and have the complete mounting system identified. The durable fix is a documented, listed support method installed within its instructions—not a drywall anchor, visual guess, or improvised fastener.



Stay in the loop
Get the latest northwest electric pros updates delivered to your inbox.