The Fastest Check — Find the Junction Box Label
Ceiling fan installation has gotten messy with all the conflicting advice flying around. As someone who’s stood in a basement holding a fan box, staring up at an existing fixture and genuinely unsure whether the swap was safe, I dug into the practical details of junction box ratings. Today, I will share it all with you.
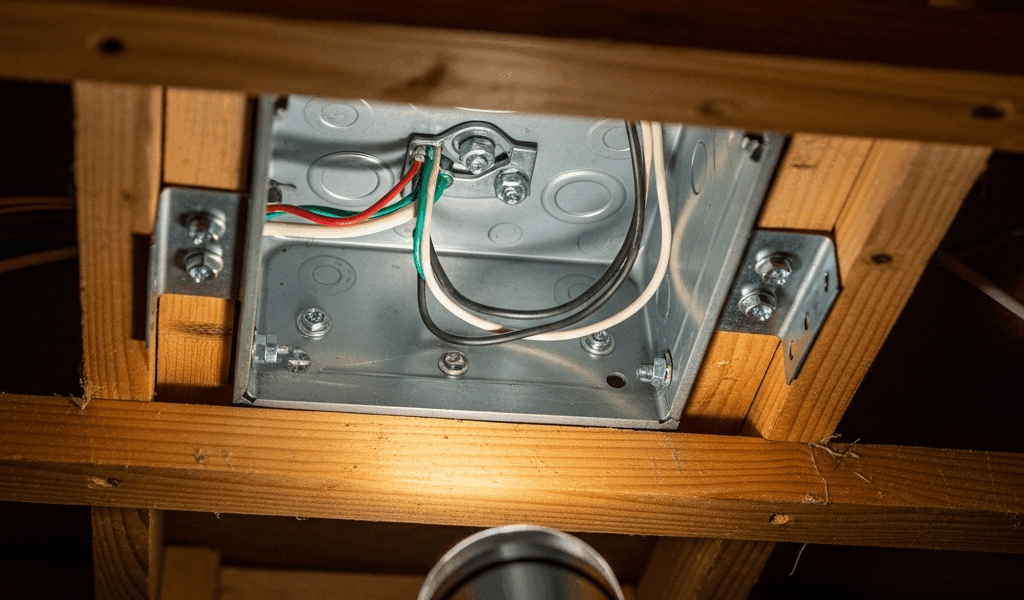
So, without further ado, let’s dive in. Kill the breaker first — at least if you want to keep all ten fingers. Once the fixture comes down, you’ll see the metal junction box screwed or nailed to the ceiling framing. Look at the inside rim and side walls. A fan-rated box carries a UL listing stamp that explicitly reads “Acceptable for Fan Support” or shows a weight rating — typically 35 lbs or 70 lbs. That label is small. Stamped right into the metal. You’re hunting for definitive language, not suggestions.
A standard light-fixture box says the opposite: “Not for Fan Support” or carries no fan rating whatsoever. No label means no fan rating. That’s a disqualification. Plastic boxes — old-work pancake styles or plastic retrofit boxes — are automatically out, regardless of any label. Plastic flexes under dynamic loads. Don’t use them for fans. Period.
If you spot the fan-support rating, write down the number. You’ll need it shortly.
How to Tell If the Box Is Braced or Just Floating
A fan-rated label is step one. Step two is confirming the box is anchored to something that actually matters. Frustrated by a wobbling fixture I’d installed in my guest room years back, I eventually discovered that even the right box fails catastrophically when it’s just floating between joists on drywall alone. Steer clear of where I went wrong.
Two mounting scenarios exist:
- Box screwed directly into a ceiling joist. Look up through the hole where the fixture was. Box bolted straight into solid wood framing? That’s your gold standard. A fan-rated box mounted this way handles most residential fans up to 70 lbs without complaint. The joist bears the load. Simple, reliable, done.
- Box mounted on a brace bar between joists. If the box isn’t screwed to visible joist wood, it’s sitting on a brace — a metal bar spanning the gap between two joists. Acceptable for fan use, but only if that brace bar is explicitly rated for fan support. A standard light-duty brace bar is not. Check the brace hardware for UL fan-rating language or dig up the manufacturer’s spec sheet before proceeding.
Old-work pancake boxes screwed to drywall with zero joist contact below are a National Electrical Code violation for fan use. Full stop. Don’t attempt this.
Here’s the physical test: grip the box and try to move it. Any wobble — any give at all — means it’s not fan-ready. A properly mounted box won’t budge. Zero play. Movement means either the box isn’t properly anchored or the brace isn’t rated for the load. Either way, fix it before you hang anything.
Worth noting: the NEC doesn’t specify fan box ratings directly. That falls under UL 514C and manufacturer specifications. Verify your specific box and brace against those standards — not generic electrical code.
What the Weight Rating Actually Means
But what is a fan-box weight rating? In essence, it’s the maximum static load the box is engineered to hold. But it’s much more than that — and the gap between “static” and “real-world dynamic load” is where things get genuinely dangerous.
Two standard ratings exist in residential work: 35 lbs and 70 lbs. A 35 lb rated box is built for a bare ceiling fan motor — no light kit. A 70 lb rated box handles a fan with a full light assembly attached. Find your fan’s weight on the product box or manual. Look for “gross weight” or “fixture weight” — not shipping weight. Most residential fans with light kits land between 25 and 50 lbs. A Hunter or Casablanca mid-range unit with a four-light kit? Typically 35–45 lbs.
Quick callout up front. Here’s the part I got wrong: I looked at static weight and assumed I was fine. A 48 lb fan-plus-light combo on a 35 lb rated box seemed survivable. It wasn’t. Dynamic load from spinning blades multiplies stress in ways a static number doesn’t capture. A 30 lb fan exerts significantly more than 30 lbs of force on the junction box during operation — blade rotation, wobble that develops over months, thermal cycling of metal, all of it compounds the effective load on those mounting screws and the brace.
Match fan weight to box rating conservatively. A 35 lb box with a 48 lb fan is a failure waiting to happen. A 70 lb box with a 40 lb fan is safe. Fan weight exceeds the box rating? You need a new box. No margin for doubt on this one.
When the Existing Box Has to Go — Replacement Options
If the label reads “not for fan support,” the box floats on drywall alone, or your fan weight blows past the rating, the existing box has to go. Two realistic upgrade paths exist for most homeowners.
Scenario one: Joist is accessible from below. Remove the old box entirely. Install a fan-rated metal box — a Raco or Southwire fan-rated unit, typically $8–15 at any hardware store — screwed directly into the ceiling joist using wood screws or lag bolts. This is the most durable fix available. The box is mechanically connected to structural wood. That was the whole point. Fifteen-minute job if the joist is exposed. The box is cheap; labor runs $50–75 if you hire it out.
Scenario two: No joist access from below — no basement, attic too tight. Use an expandable brace kit. A Westinghouse brace bar or Raco brace rated explicitly for fan support gets inserted through the existing hole and expands between joists, anchoring the new fan-rated box without attic access. Cost: $15–30 for the brace kit plus a new fan-rated box. Installation runs 10–20 minutes. Verify the brace kit carries UL fan-support language — light-duty brace bars sold near fan hardware sometimes carry no fan rating at all. I’m apparently unlucky enough to have grabbed one of those once, and my ceiling paid for it. Don’t use them.
When to call an electrician: large ceiling medallion that blocks new box placement, aluminum wiring — which requires special handling — or a vaulted ceiling with minimal depth above the drywall. Those scenarios warrant a professional. No shame in it.
The 60-Second Pre-Install Checklist
Before the fan goes up, run through this. It’s the same checklist an electrician runs on every single installation. This isn’t overcaution — it’s standard practice. Sixty seconds now versus thousands in ceiling damage and injury risk later.
- Box has UL fan-rated label. Yes or no. If no, stop.
- Box is screwed to joist or fan-rated brace. Yes or no. Wiggle test it — at least if you want to actually know. If no, stop.
- Fan weight is within box rating. Yes or no. Subtract 10 lbs as a buffer. If no, stop.
- Box shows no cracks, corrosion, or loose mounting screws. Yes or no. A compromised box is the weakest link in the whole system. If no, replace it.
- Wiring is 14 AWG or 12 AWG copper — not aluminum. Yes or no. Aluminum wiring requires different connectors entirely. If unsure, call an electrician.
Any single no answer means stop and fix the issue before proceeding. That’s what makes this checklist endearing to us DIYers — it’s short enough that skipping it is genuinely harder than just doing it.


Stay in the loop
Get the latest northwest electric pros updates delivered to your inbox.