When You Can Wire It Yourself and When You Cannot
Bathroom exhaust fan wiring has turned into a moving target with all the conflicting advice flying around. As someone who’s wired two fans in my own house — and called a professional for a third job because I knew I was in over my head — I worked through the fundamentals of where the line actually sits. Today, I will share it all with you.
Replacing an existing fan on an existing circuit in the same location? You can handle that yourself. The wiring path is already there. You’re swapping hardware. That’s it. But running a new circuit from your main panel, adding a subpanel, or fishing cable through finished walls you can’t access from above — stop right there. Those jobs require permits in most jurisdictions. The National Electrical Code (NEC 210.11) mandates dedicated 20-amp circuits for bathrooms, and inspectors do not look the other way on this stuff. Don’t gamble on that one.
There’s a middle ground, though. Running a new switch leg from an existing fan box to a new switch location through unfinished attic or basement space — that’s doable if you’re comfortable fishing wire. Old plaster in a 1970s house, though? That gets painful fast. New drywall in a finished basement? You have options.
What You Need Before You Touch Anything
Worth flagging before going further. Get these tools together before you climb into that ceiling:
- Non-contact voltage tester — a Fluke or Klein, somewhere around $12–20 — this thing saves your life
- Wire stripper that handles both 14 and 12 gauge
- Wire nuts in the sizes your old fan used (usually yellow or red)
- Electrical tape
- Needle-nose pliers and a regular screwdriver
- 14-2 or 12-2 NM cable if you’re running a switch leg — gauge depends on your breaker, so check the panel first
- A headlamp, because you will absolutely need both hands free
Before cutting power, figure out which circuit your bathroom fan actually lives on. Go to the breaker panel, flip breakers one at a time, and wait for the fan to stop. Write down the amperage — usually 15 or 20 amps — and note the wire gauge you see at the fan box. 14-gauge wire means a 15-amp circuit. 12-gauge means 20 amps. You can’t run new 12-gauge wire on a 15-amp breaker. That’s just how it works.
Once you know the circuit, kill the breaker. Then verify it’s actually off using that non-contact tester. Hold it against the wire — no beep, no light, you’re safe. I’m apparently someone who double-checks this every single time, and that habit works for me while skipping it never works out for anyone. I’ve watched people work hot because they were sure they killed the right breaker. Then suddenly they weren’t sure anymore.
Scenario 1 — Swapping a Fan on an Existing Switch Circuit
You have a fan, it has a switch, and you’re dropping in a new one at the same location. Simple enough. Remove the old fan’s ductwork first, then the mounting screws. The housing comes out and exposes the wires.
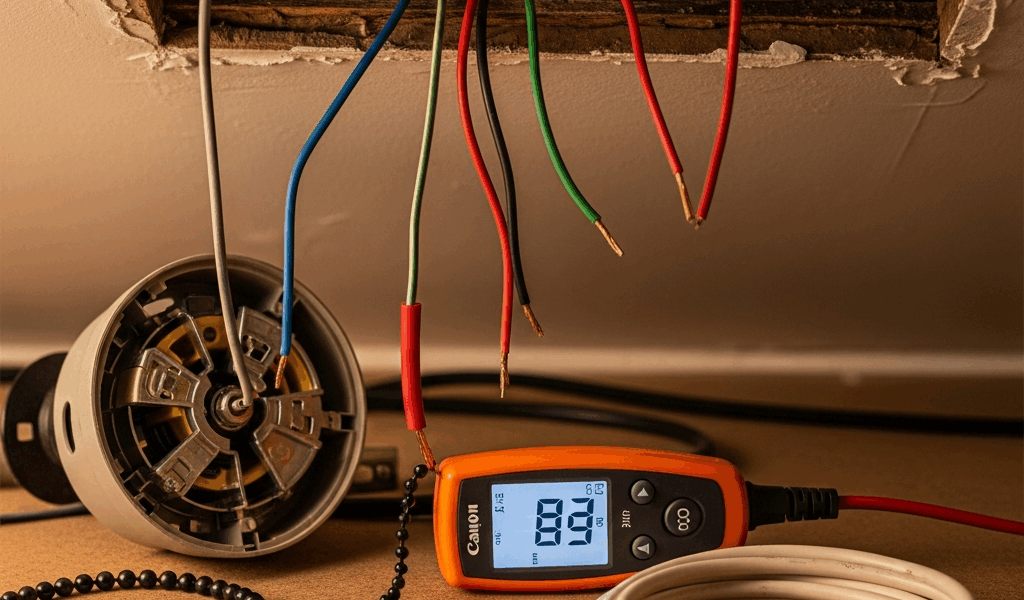
But what are those three wires? In essence, they’re your power delivery system — black (hot), white (neutral), and green or bare copper (ground). But it’s much more than that once you understand what each one does. The black wire connects to a brass screw terminal on the fan motor. White goes to a silver terminal. Ground connects to a green terminal or directly to the metal housing via a small screw.
Loosen the wire nuts — counterclockwise — and separate everything. Now look at your new fan’s terminal configuration. If your new fan requires a ground wire and the old one didn’t have one running to it, that’s a real problem. Run a ground wire from the fan box to the housing. Not optional on newer models — manufacturers like Broan and Panasonic both flag this in their install sheets.
Connect black to brass. Hot goes to brass — memorize that. White to silver. Ground to green or the housing frame. Twist the wire ends parallel first, then thread the wire nut on clockwise until it’s genuinely tight. Tug each connection hard. If anything pulls free, the wire nut wasn’t seated properly. Do it again.
Reinstall the fan, reconnect the ductwork, restore power, and test it. Fan runs, switch turns it off — done. If it hums but the blade doesn’t spin, you reversed hot and neutral. Go back, swap the black and white at the fan terminals, and test again.
Scenario 2 — Wiring a Fan to a Separate Wall Switch
Your fan was on a pull chain or shared a switch with the bathroom light. You want a dedicated wall switch — usually just outside the bathroom door, which is where most people end up wanting one anyway.
Run 14-2 or 12-2 cable from the fan box to the new switch location. Attic or basement access above the bathroom makes this manageable — fish the wire through that space and you’re mostly fine. No access? That means cutting drywall, threading wire through studs, and patching everything afterward. That’s not dangerous work. It’s just tedious and surprisingly skill-dependent. Skip the misstep I made of assuming it goes faster the second time.
Once the wire reaches the new switch box, strip about 6 inches of outer sheath. The black wire becomes your switch leg, carrying power between the fan and the switch. Connect it to one screw on the switch. White wire to the other screw. Ground goes to the green screw on the switch box — or gets capped with a wire nut and clipped to the box if it’s metal.
Back at the fan box, connect black from the switch leg to the fan’s black terminal. White from the switch leg to the fan’s white terminal. Ground to ground. That’s what makes this setup endearing to us DIYers — it’s genuinely straightforward once the wire is actually in the wall.
Common Wiring Mistakes That Cause the Fan to Not Work
Reversed hot and neutral — The fan hums but the blade doesn’t spin. Motor’s getting power, polarity’s backwards. Kill the breaker, swap the black and white connections at the fan terminals. Test again. That’s usually all it takes.
Loose wire nut connections — Fan works fine for two weeks, then starts cutting out randomly. Vibration from the motor loosens the nut over time. Turn off the breaker, twist each nut clockwise until it’s hand-tight plus a quarter turn, and pull hard on each wire to confirm it holds. I had this happen with a NuTone 763N I installed in 2019. Took me longer to diagnose than it should have.
Forgotten ground bond — Newer fans require the ground wire to physically contact the metal housing — not just terminate at the terminal block. If your old fan skipped a ground entirely and your new one expects one, run a short ground wire from the terminal to a screw on the metal frame. I missed this on my second fan replacement and spent twenty minutes wondering why the motor sounded slightly wrong. It was this. It was always this.
Installing a timer on a non-rated fan — Electronic timers assume the fan motor can handle their switching frequency. Check the documentation before you buy anything. If the fan spec sheet says “suitable for wall controls only,” a timer will burn that motor out faster than you’d expect — sometimes within a few months. The fan will tell you nothing is wrong right up until it doesn’t run anymore.


Stay in the loop
Get the latest northwest electric pros updates delivered to your inbox.